OBS Setup to Replace AmarecTV
Summary
This is for users who are using Amarec primarily for recording gameplay in its own separate video, while simultaneously streaming with webcam, layout, timer, etc.
If you’re using Amarec solely for its deinterlacing features (e.g. when using gv-usb2, dazzle, or ezcap) and don’t care about your recording having more content than just gameplay, this isn’t necessarily for you. However, you should be able to use OBS Studio to deinterlace without any issues, as far as I know.
Requirements
- OBS Studio Portable
- Choose “Download Zip”
- Your favorite streaming program that supports NDI. I’m using OBS Studio. This can be the install you have already.
- OBS NDI Plugin
- A Video capture source that works in OBS. (This is usually a capture card but could also be window, monitor, game capture, etc).
Portable OBS Install
- Extract the OBS-Studio-x.y.z-Full-x64.zip that you downloaded into a folder on your system. For my examples, I’ll be using
G:\obs-recording - Browse to
g:\obs-recording\bin\64bitin Explorer. - Find obs64.exe in this folder in Explorer
- Right-click obs64.exe and select “Create Shortcut”
- (Optional) Rename the shortcut to “obs-recording”
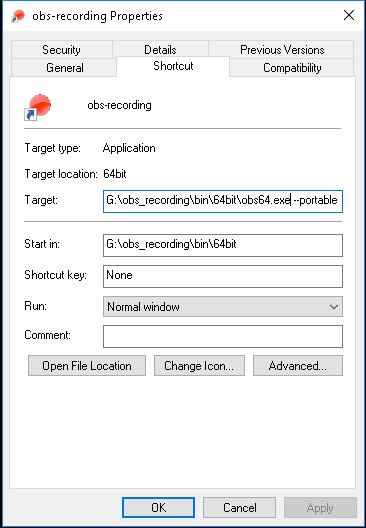
- Right-click “obs-recording” shortcut and select properties.
- In the “Target” field, add
--portablesuch that it containsG:\obs_recording\bin\64bit\obs64.exe --portable
When you launch OBS via this shortcut, the scenes and settings will now be stored within the G:\obs_recording folder.
Install OBS-NDI Plugin into OBS portable
- Download the NDI Runtime and Windows ZIP version of the OBS-NDI plugin from here
- Extract the ZIP into your portable OBS folder, e.g.
G:\obs-recording. - Install the NDI™ 3.5+ Runtime. Instructions indicate a reboot will be required.
Portable OBS Configuration
I’ll leave most of the configuration to you, but remember this is what will be used to record your gameplay video and audio.
The one special thing you need to do is to add a new filter to your scene (or to your video capture source)
- Add your video capture device source to OBS and configure it as required. Make sure to send audio to out to stream.
- On either the scene or the video capture source, right-click and add a filter.
- Under “Effect Filters”, add “Dedicated NDI™ Output”
- In the NDI Name field, choose something meaningful. Mine is named “Video feed”
- Configure recording as needed. There is no need to setup streaming
- Due to potential issues with CPU usage, using nvenc, qsync, or vce might be necessary. Use a high bitrate.
- Lots of people use amarec with lagarith. high quality or lossless h264 is the easiest replacement
- Make sure to set up your video settings (e.g. resolution and framerate). Keep in mind you can record in any aspect ratio (e.g. 4:3 960x720)
Main Streaming Application Configuration
OBS Studio
- Install or update OBS Studio (Or, if you’re using a portable version for your main OBS, follow the portable OBS install above using a different destination folder. Then skip to step 4)
- Download the OBS-NDI windows installer from here here
- Run the installer to install the OBS-NDI plugin on your main OBS instance.
- Launch OBS Studio
- Disable your old source, if applicable
- Add a new NDI™ Source
- Choose the name you used in the previous section. It will have your computer’s hostname in front of it.
Other
¯\_(ツ)_/¯
